The complete guide
How to auto-cut a multicam from raw clips.
From the camera cards and recorder files to a finished Final Cut Pro edit that cuts to whoever's talking. Speaker Cut syncs the sources, builds the multicam, does the switching, and hands you a timeline. About 10 minutes end to end — no prep in Final Cut first.
Only have one recording, with no separate mics?
Use Highlight Cut instead. Speaker Cut tells the voices apart in a single video, names who's who, and turns the best moments into Final Cut timelines. Follow the Highlight Cut guide →
Gather your sources
Two minutes of sorting before you open the app. Get every file in one place and decide which feed is your master.
Collect every camera and recorder file
Pull every camera angle and every external audio-recorder file (lav packs, a Zoom or field recorder, a StreamYard program track) into one folder. Media stays where you put it — Speaker Cut references it, never copies or uploads it.
Pick your master (monitoring) angle
The master is the one feed that hears everyone — your program mix, a room mic, or in an in-person shoot any camera that picks up the whole table. Every other angle is synced against it by audio, so it just needs a clean recording of the full session.
Think in angles: one per camera or mic
Each person's camera is one angle and their clean mic is another — even when both came off the same camera card. A wide or room cam is its own angle too. Naming them by person + role (April — Cam, April — Lav, Room — Wide) makes the lane assignment later a two-click job.
Build the multicam in Speaker Cut
Drop the clips into angles, mark the master, and let Speaker Cut listen and line everything up.
Choose “Build a multicam from clips”
Open Speaker Cut. On the home screen pick the recommended path, Build a multicam from clips, and give the session a name (a date and the guest works well — it becomes the project name in Final Cut).
Add an angle for each camera and recorder
Click + Add an angle, type its name, and drop that source's clip(s) onto it. Drop all of an ATEM angle's split files onto the one angle — Speaker Cut orders and joins them. External audio recorders drop in as audio-only angles; that's expected.
Mark exactly one angle as Master
Click Set master on the feed you chose in Part 1. It turns gold. You need at least two angles with clips and exactly one master before Build multicam lights up.
Build, then read the sync report
Hit Build multicam. Speaker Cut listens to every angle against the master and reports each one's offset, a confidence meter, and any drift across the session, flagged Locked, Low conf. or No lock. Locked all the way down means you're done here.
Continue to cut
Press Continue to cut →. The assembled multicam loads straight into the cut — the same screen you'd land on with a Final Cut export, angle names and all.
Already have a multicam in Final Cut Pro? Use it.
Speaker Cut still takes a Final Cut export unchanged. Build the multicam clip in Final Cut (right-click your clips → New Multicam Clip…, sync by audio or timecode), name each angle by person + role in the Angle Editor, then File → Export XML…. On the Speaker Cut home screen choose I already have a multicam and drop the .fcpxmld bundle, a zip of it, or the Info.fcpxml inside. Both paths get the same cut.
Cut it
Tell Speaker Cut who's who, set the feel, and let it build the edit.
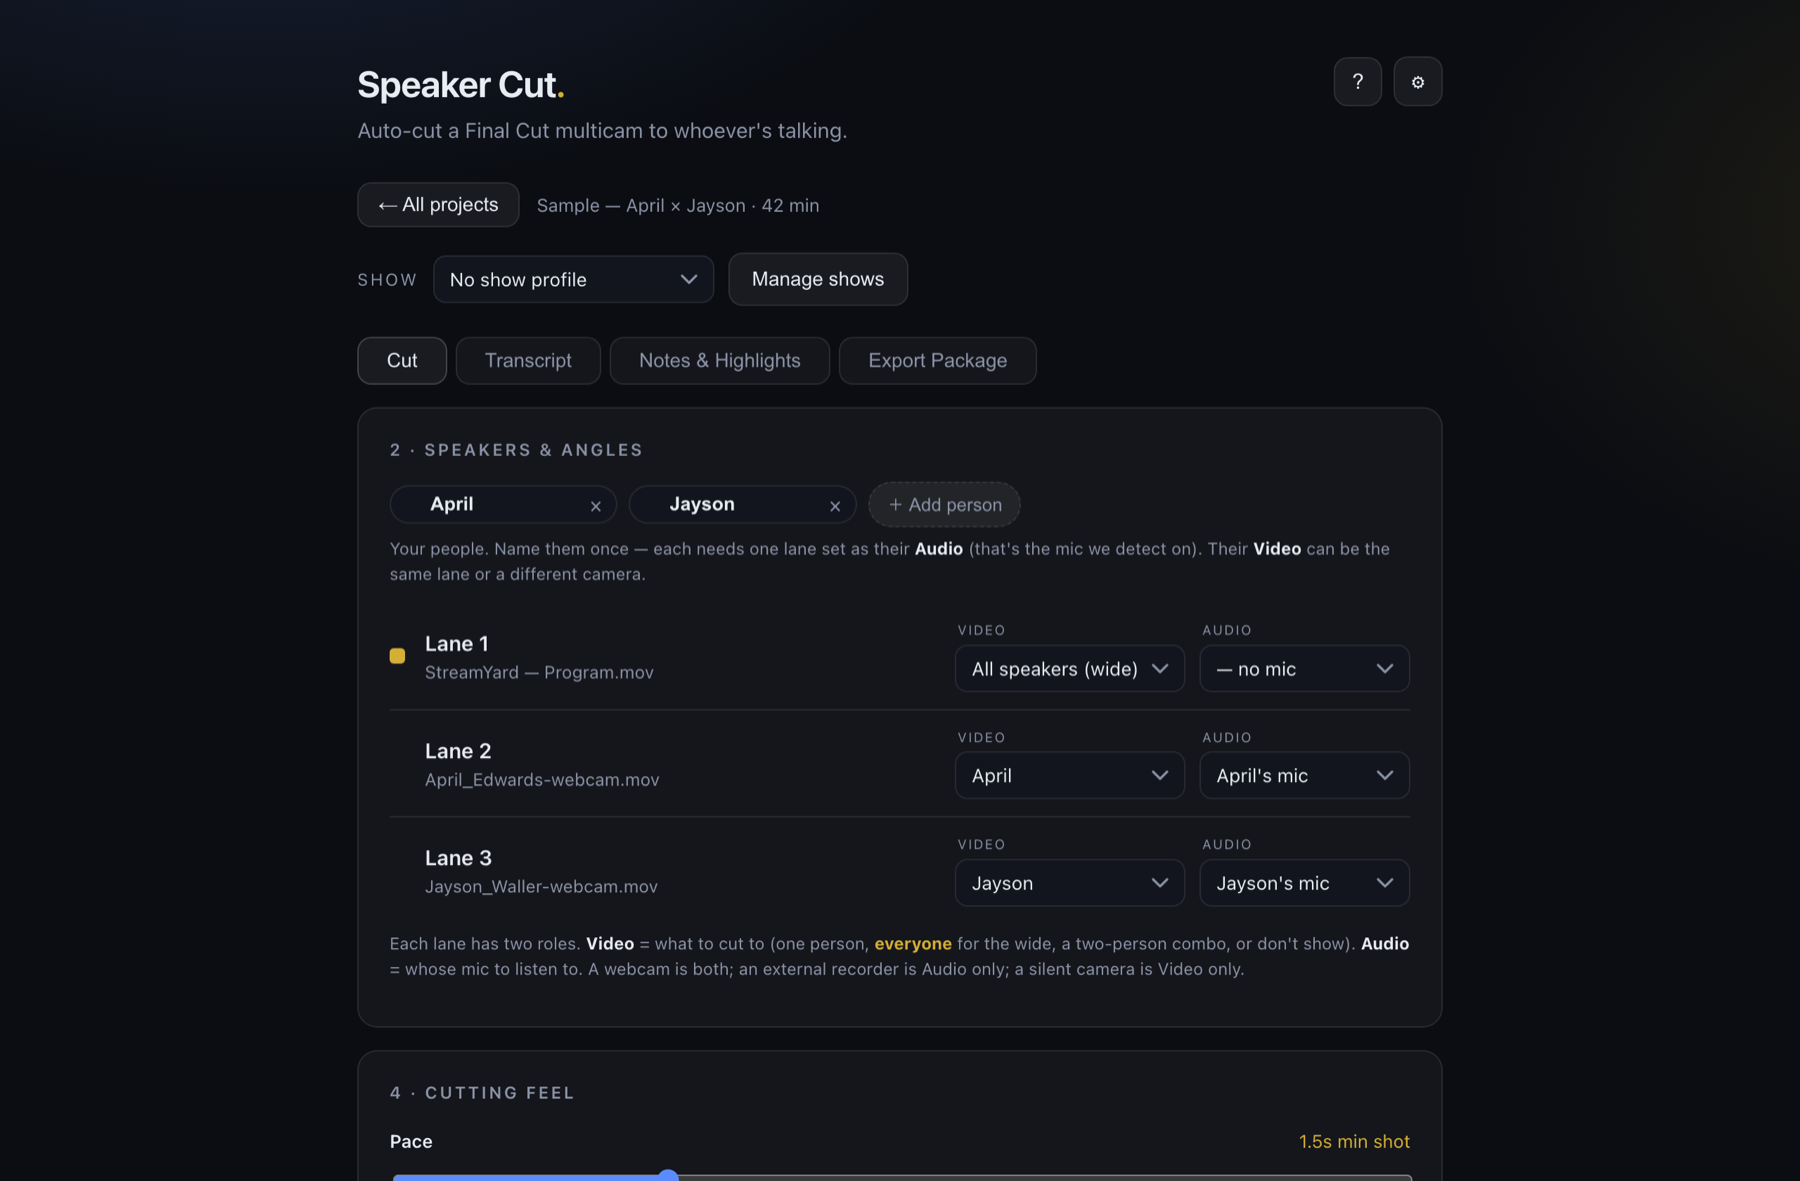
Name your people & assign lanes
Add each speaker, then for every person set which lane is their Video (the camera to cut to) and which is their Audio (the mic to detect them on). A webcam is both; an external recorder is audio-only; a wide or room cam is video-only, or set it as the "all speakers" shot.
Dial in the cutting feel
Set the pace and minimum shot length, decide how eager the switches are, choose how often B-cams get a turn, and when to fall back to the wide. This is where the edit gets its rhythm — faster for energetic banter, calmer for a formal interview.
Turn on Auto-mix (One & Pro)
With Auto-mix on, each person's mic lands in the Final Cut timeline on its own lane with volume keyframes that duck it whenever they're not talking — mic bleed and room tone gone, every reaction kept. Nothing is baked in: the keyframes are ordinary Final Cut keyframes, so you can drag any of them if a moment needs a different call.
Generate, then open it in Final Cut
Hit generate and Speaker Cut builds the auto-cut. On One or Pro it also transcribes the episode and writes AI show notes, highlights & hooks. Export the package and import the FCPXML into Final Cut Pro: the multicam, the synced angles and the cut arrive together, linked to your original media. Tweak from there — you keep full control.
Common questions
How does Speaker Cut sync my clips? Do I need timecode?
I recorded audio on an external recorder, separate from the cameras. Does that work?
What if an angle shows “No lock” in the sync report?
Do I need to build the multicam in Final Cut first?
Is my footage uploaded anywhere?
Ready to cut your first one?
Drop your clips, mark the master, and watch the edit build itself. The app is free to try.